This week I had hoped to present a new design I was making for an entry into one of Threadless's themed competitions, but life and computer complications prevented me from completing it before the deadline. My design included fire, and in wanting to make it as realistic as I could, ended up devising my own method for doing so in PSE. I hope other PSE users will find this helpful.
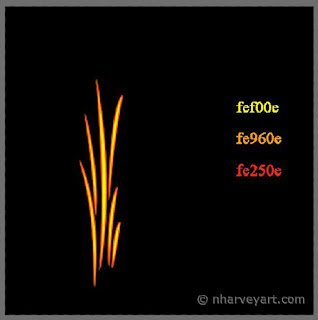
1. Begin by opening a blank document and filling the background with black. Here I'm using 5" x 5" at 120 px/in. On another layer, I add some color samples off to the side so when I'm ready to change colors, I can just use the color picker. I'm using fef00e (yellow), fe960e (orange), and fe250e (red).

2. We'll need some thin yellow lines. You can draw them, but here I'm going to use the "Grass 2" shape, making it tall and thin. Don't make it too tall, as we'll be stretching it out upwards. Simplify the shape if you're using that method.
 3. Using the color picker, make orange your foreground color. Rasterize the shape by holding CTRL and clicking the thumbnail in the layers palatte. Now go to Edit>Stroke (Outline) Selection. Make sure orange is the color in the dialogue box, and "Inside" is selected under Location. Choose an appropriate width. I'm using just 1 px here. Click OK.
If you can't see the orange or it's blocking out too much of the yellow, just undo the action (CTRL-Z), adjust the width, and do it again.
4. Change the foreground color to red, then stroke it again. This time choose "Outside" for Location. I'm using 1 px again, but if you used a larger number for the orange, consider using a little less for the red. Click OK. Deselect the image (CTRL-D) then go to the layers palatte and make 2 copies of this layer.
One of these layers is simply a backup in case you decide to trash a layer and start over. Since we'll work only one at a time, only one needs to be visible.

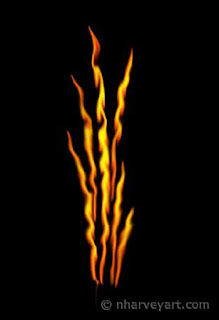
5. With the visible layer, go to Filter>Distort>Liquify. Go over each of your lines with the Warp Tool (top of the tools on the left--looks like a hand finger-painting). Go over each or the lines a few times giving each a little bit of wiggle. I used a brush size of 20 (diameter should be a little more than the thickness of the lines) and brush pressure of 100. Click OK. It should look something like this:
 6. Now take the smudge tool and start bluring the liquified lines, first going in short upwards strokes, then gently smudging them out to the sides. I'm using a soft-edged brush at 20 px and 10% strength. (I recommend making a copy of this layer first. It's very easy to use more smudge strokes than you can undo, and if you'd like to start over, you won't have to re-do the liquify step as well).
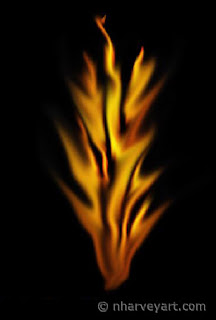
7. Make that layer invisible, then repeat the Liquify and Smudge steps with another layer. Try to make the Liquify wiggles a little different. For the Smudging on this layer, I changed the brush to 30 px and the strength to 60%. This time you want to really spread out the pixels, creating more tongues of flame from the lines. Make sure these end in a point, perhaps giving them some curves. (Again, you might want to make a copy of the layer between these steps.)
8. After that, make both layers visible. You can play with opacities, layer order and blending modes to see what looks best for your purposes. Here I have the more smudged layer on top with the blending mode set to Screen. The less smudged layer has the opacity set to 65%. And then you're done.
Oh, and one more nifty tidbit I discovered: When you want to undo a long series of actions (like a series of smudge strokes), you don't have to do CTRL-Z for every one. Just hold down CTRL and hit Z repeatedly as fast as you like. Nice little time (and irritation) saver.
Now get out that list of drawing ideas and set something on fire!
Thanks for visiting and please come again!


Nice! Thank you so much for the tutorial! I need to get back to exploring more of PSE. Maybe in the fall when I'm feeling more studious! Those flames are really beautiful. (Don't you hate it when computer problems get in the way of making deadlines?)
ReplyDeleteThanks for the compliment! Still dealing with sporadic crashes and slow-downs. Unfortunately (for me) my chief technical officer has moved out of the house and is busy with his own life, so I have to be very patient for his advice.
Delete